The Dolomites, a UNESCO World Heritage Site in northeastern Italy, are a dream destination for landscape photographers. With towering peaks, lush valleys, and idyllic alpine villages, the Dolomites offer endless opportunities to capture breathtaking images. This guide explores the best photography locations, complete with tips on light direction, filter usage, and the best moments for the perfect shot.
Tre Cime di Lavaredo: Photographing the Iconic Peaks
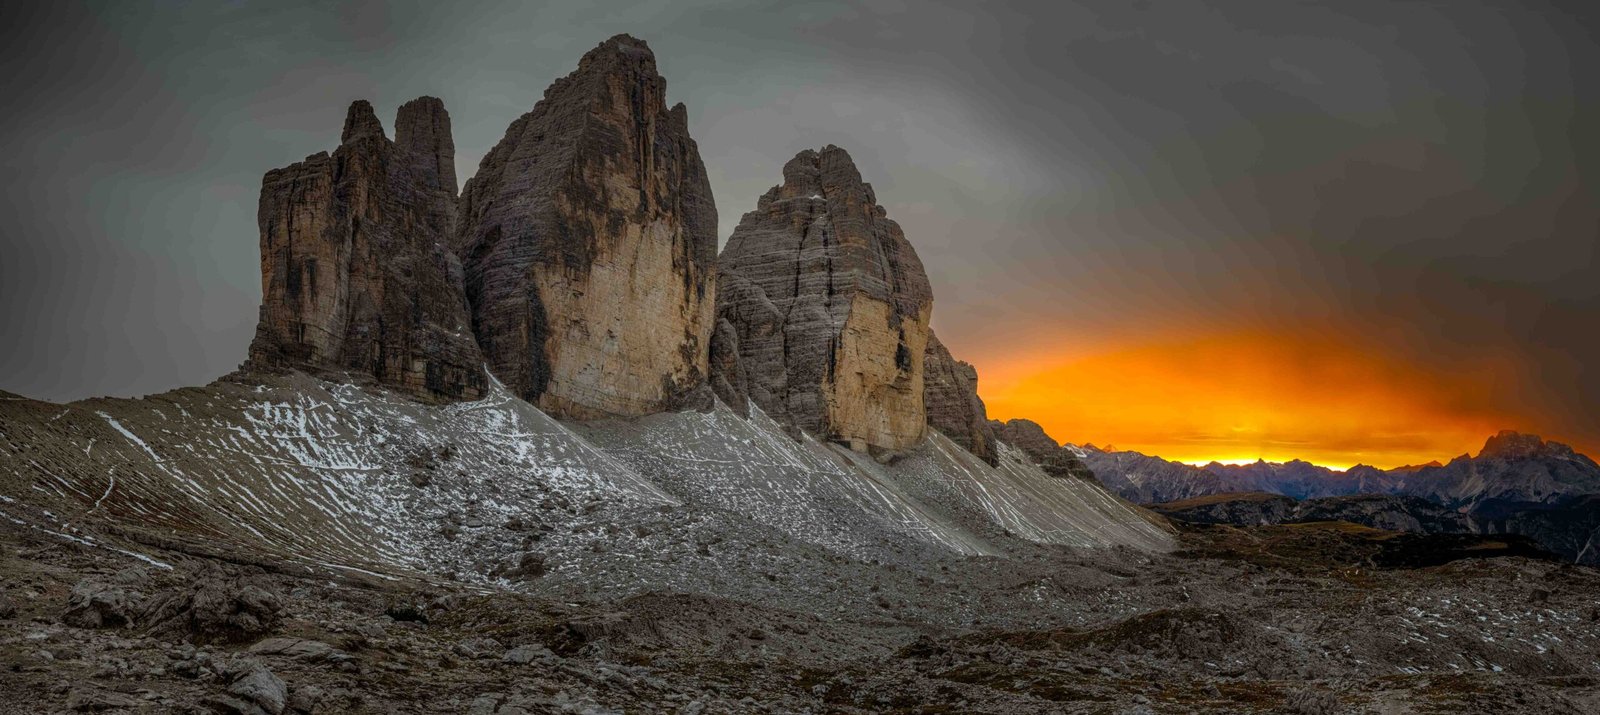
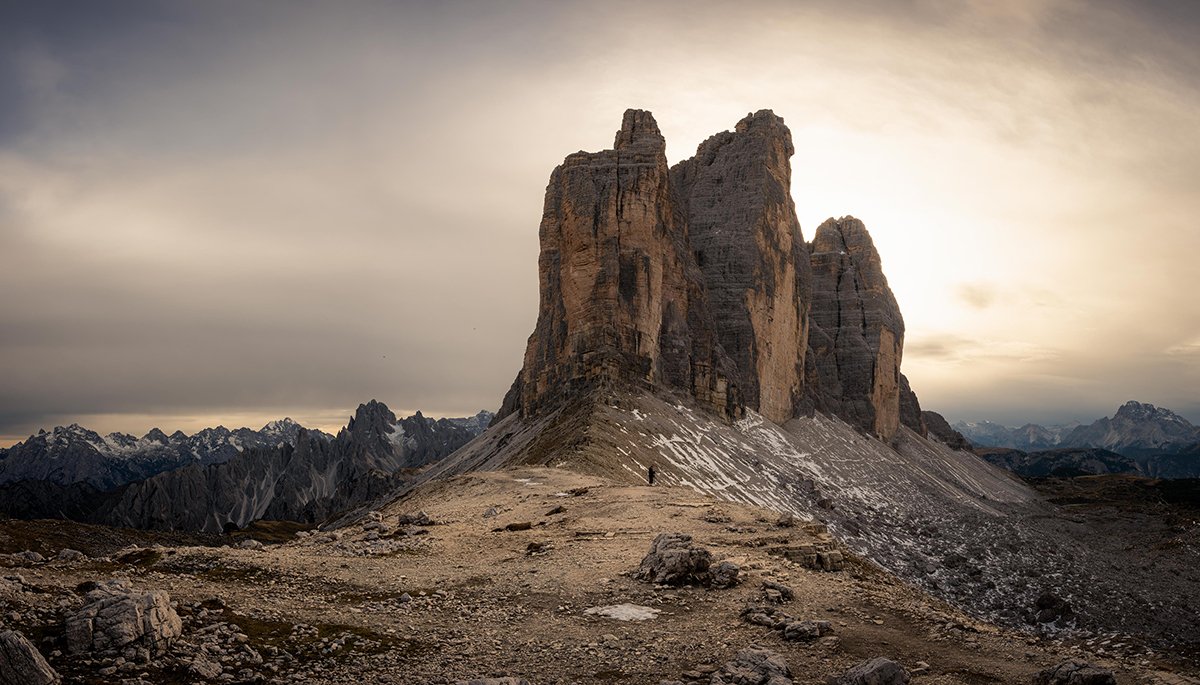
Tre Cime di Lavaredo, or the “Three Peaks of Lavaredo,” is one of the most iconic landmarks in the Dolomites. These three imposing peaks are especially enchanting at sunrise and sunset, when warm light casts a golden glow over the rugged landscape.
I was there at the end of the day and was able to experience the sunset. It wasn’t clear weather, but I still managed to capture some beautiful shots.
Do bring a headlamp. If you have to walk back over the boulders in the dark, it’s absolutely essential! Read here more about my experience at Tre Cime di Lavaredo.
Light & Timing
Sunset (recommended): The most photogenic side of Tre Cime catches the last light of the day best. The sun sets behind you, illuminating the peaks beautifully with warm tones and the famous alpine glow.
Sunrise: The sun rises behind the peaks, offering opportunities for dramatic silhouettes and sun rays between the summits. From Rifugio Locatelli, you have a frontal view of the illuminated peaks.
Milky Way: Due to the relatively remote location and altitude (2,300m+), this is an excellent spot for astrophotography. The peaks are perfectly positioned for Milky Way shots during summer months.
Best Photo Locations at Tre Cime
- Forcella Lavaredo: The classic viewpoint with the three peaks against an endless backdrop of mountains. Ideal for wide-angle shots.
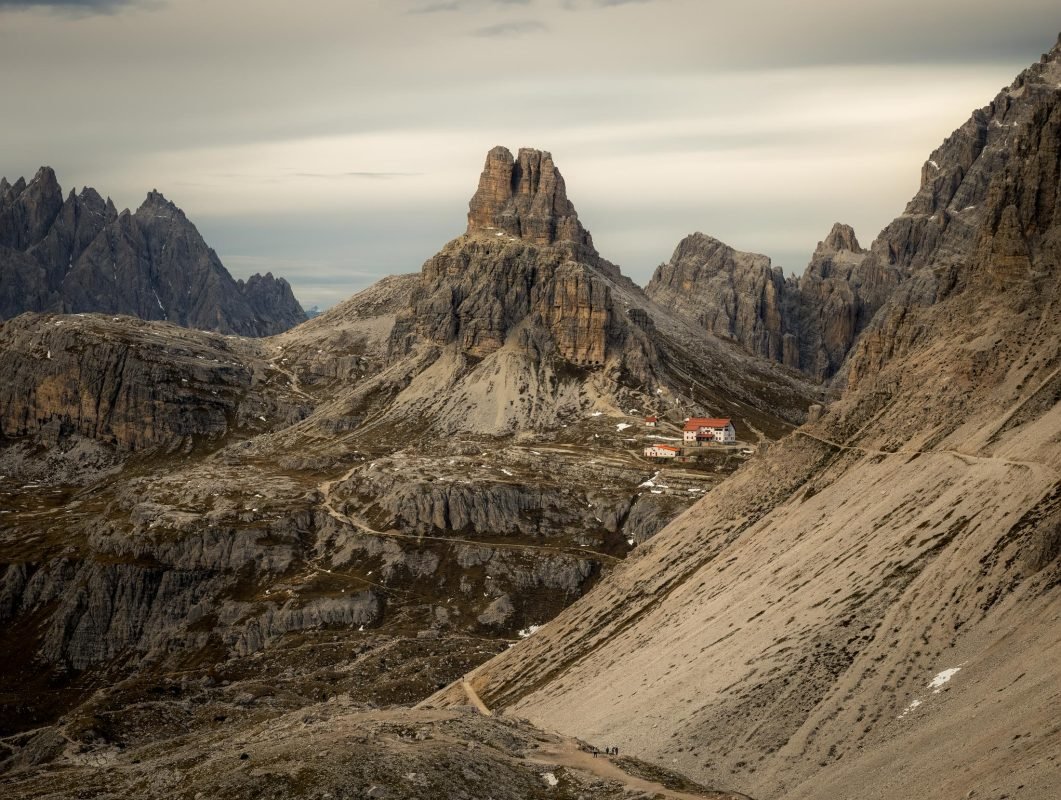
- Rifugio Locatelli: Frontal view of Tre Cime, with the mountain hut as a scale element. Perfect for sunrise.
- WWI Bunkers: The cave entrances above Rifugio Locatelli form natural frames for the peaks. Spectacular at sunset.
- Sorgenti del Fiume Rienza: Small ponds at the river source offer reflection opportunities – rare in this rocky landscape.
Equipment & Settings
- Lenses: Wide-angle (16-35mm) for landscapes and panoramas. Telephoto (70-200mm) for details and compression of mountain layers.
- Filters: Polarizing filter to deepen the blue sky and reduce reflections on rocks. GND filter (0.9) can help with high contrast between sky and foreground.
- Tripod: Essential for sunrise/sunset and panoramas. Choose a sturdy one – it can get quite windy here.
- Overnight stay: Rifugio Lavaredo or Rifugio Locatelli for both sunrise and sunset. Book well in advance! Payment in cash only.
Lago di Braies: Capturing Reflections
Lago di Braies, also known as the “Pearl of the Dolomites,” is a breathtaking alpine lake with crystal-clear water, surrounded by forests and mountains. The wooden boathouse and boats at the lake’s edge are favorites among photographers.
Want to know more about this beautiful location? Read my detailed article about Lago di Braies: Photography at the Pearl of the Dolomites.

Light & Timing
Sunrise (strongly recommended): This is THE moment for Lago di Braies. The first sunrays hit the mountain tops while the lake is still mirror-smooth. Be there at least an hour before sunrise to choose your position.
Weather conditions: Calm weather is crucial for perfect reflections. Check the wind forecast – even a light breeze disturbs the mirror image. Early mornings are usually the calmest.
Avoid: Between 10:00 and 15:00, the lake is overcrowded with tourists and day-trippers. The boathouse rents boats from 08:00, meaning the classic composition with moored boats is only possible before that time.
Equipment & Techniques
- Polarizing filter: Essential! Reduces reflections on the water surface and enhances colors. Note: with perfect mirror images, you sometimes want no polarization – rotate the filter to adjust the effect.
- ND filter (6-10 stops): Use an ND filter to make the water extra smooth when there’s light rippling. A shutter speed of 2-8 seconds makes small disturbances invisible and creates a dreamy effect.
- Lenses: Wide-angle (16-35mm) for the classic composition with boathouse. Telephoto for details of the boats or mountain wall.
- Composition: The boathouse is the classic subject, but don’t forget the west shore – here you have a nice view of the mountains with the lake in the foreground.
Reflection tip: A long shutter speed with ND filter can help if the water is lightly rippling. Even 2-4 seconds can be enough to smooth out small disturbances and get that perfect mirror reflection. However, watch out if there’s wind and you also have trees and foliage in your composition. In that case, take multiple shots with different shutter speeds and combine them in Photoshop.
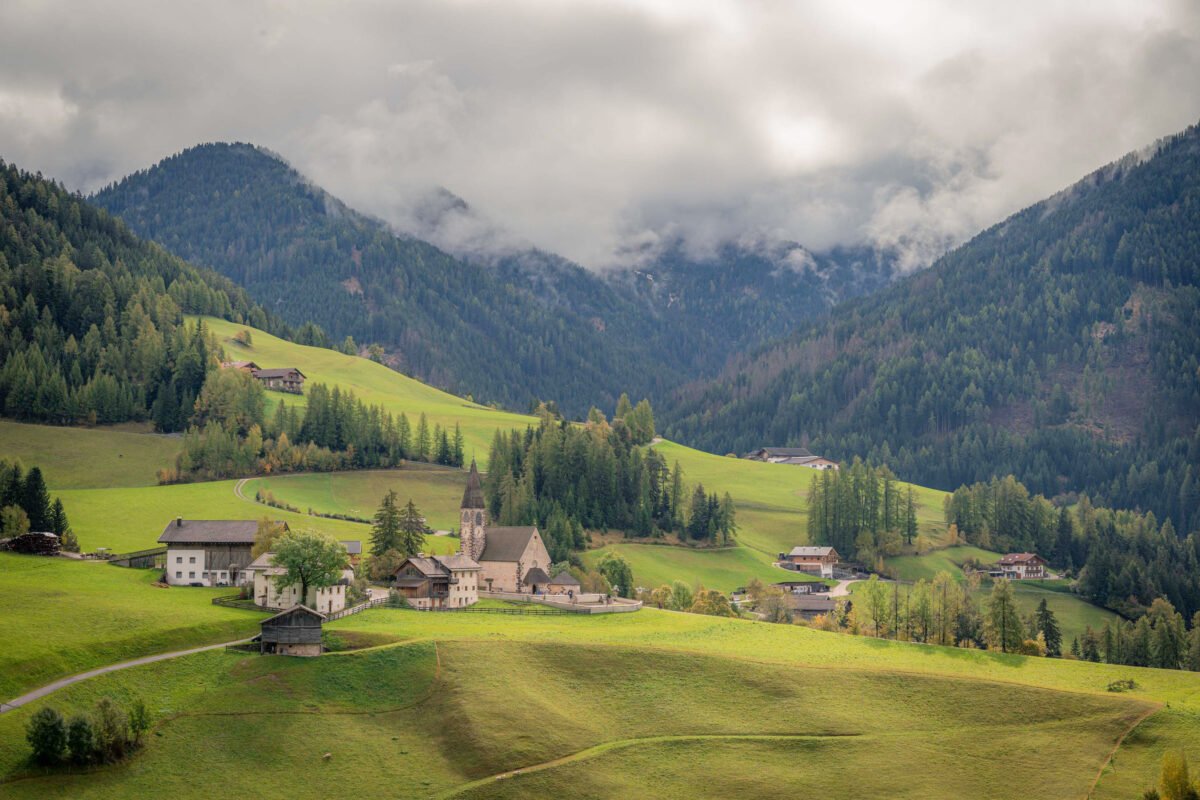
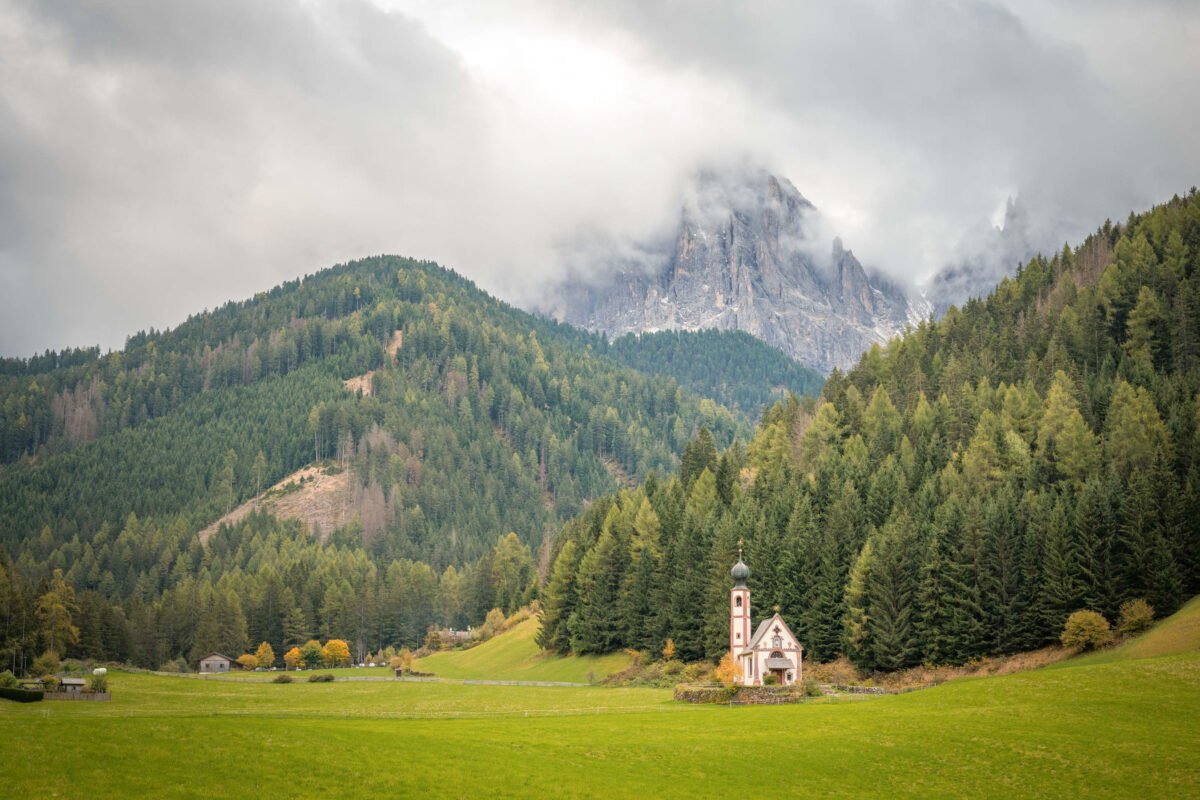
Val di Funes: Photographing the Iconic Church
Val di Funes (Villnößtal in German) is perhaps the most photographed valley in the Dolomites. The picturesque church of Santa Maddalena with the imposing Geisler peaks in the background is an image you’ll undoubtedly recognize. But believe me: in real life, it’s even more impressive. When I was there, it was heavily overcast and the Geisler peaks were completely shrouded in clouds. But that’s all the more reason to return to this beautiful location!
A few kilometers further lies the Ranui Chapel (San Giovanni in Ranui), a tiny baroque chapel that is particularly photogenic.
For a complete guide to this location, read my article Val di Funes: Hiking and Photography in the Most Beautiful Valley of the Dolomites.
Light & Timing
Sunset (recommended): The last light illuminates the Geisler peaks spectacularly, while the valley is already in shadow. This contrast makes the mountains extra dramatic.
Autumn (October): The larches turn golden yellow and orange – this is the absolute highlight for photography here. Combine with morning mist for magical atmospheric images.
Equipment & Composition
- Telephoto lens (70-200mm): Almost mandatory for the classic shot. The compression brings the church and mountains visually closer together.
- Wide-angle: For a broader perspective of the entire valley with meadows in the foreground.
- GND filter: Useful at sunset to balance the bright light on the peaks with the darker foreground.
- Viewpoints: The famous viewpoint above Santa Maddalena offers the classic shot. But also explore the roads around St. Peter for alternative compositions.
If you don’t have a GND filter or can’t use it, you can also take multiple photos with different exposures (exposure bracketing) and combine them in Lightroom or Photoshop. Be careful with moving elements though.
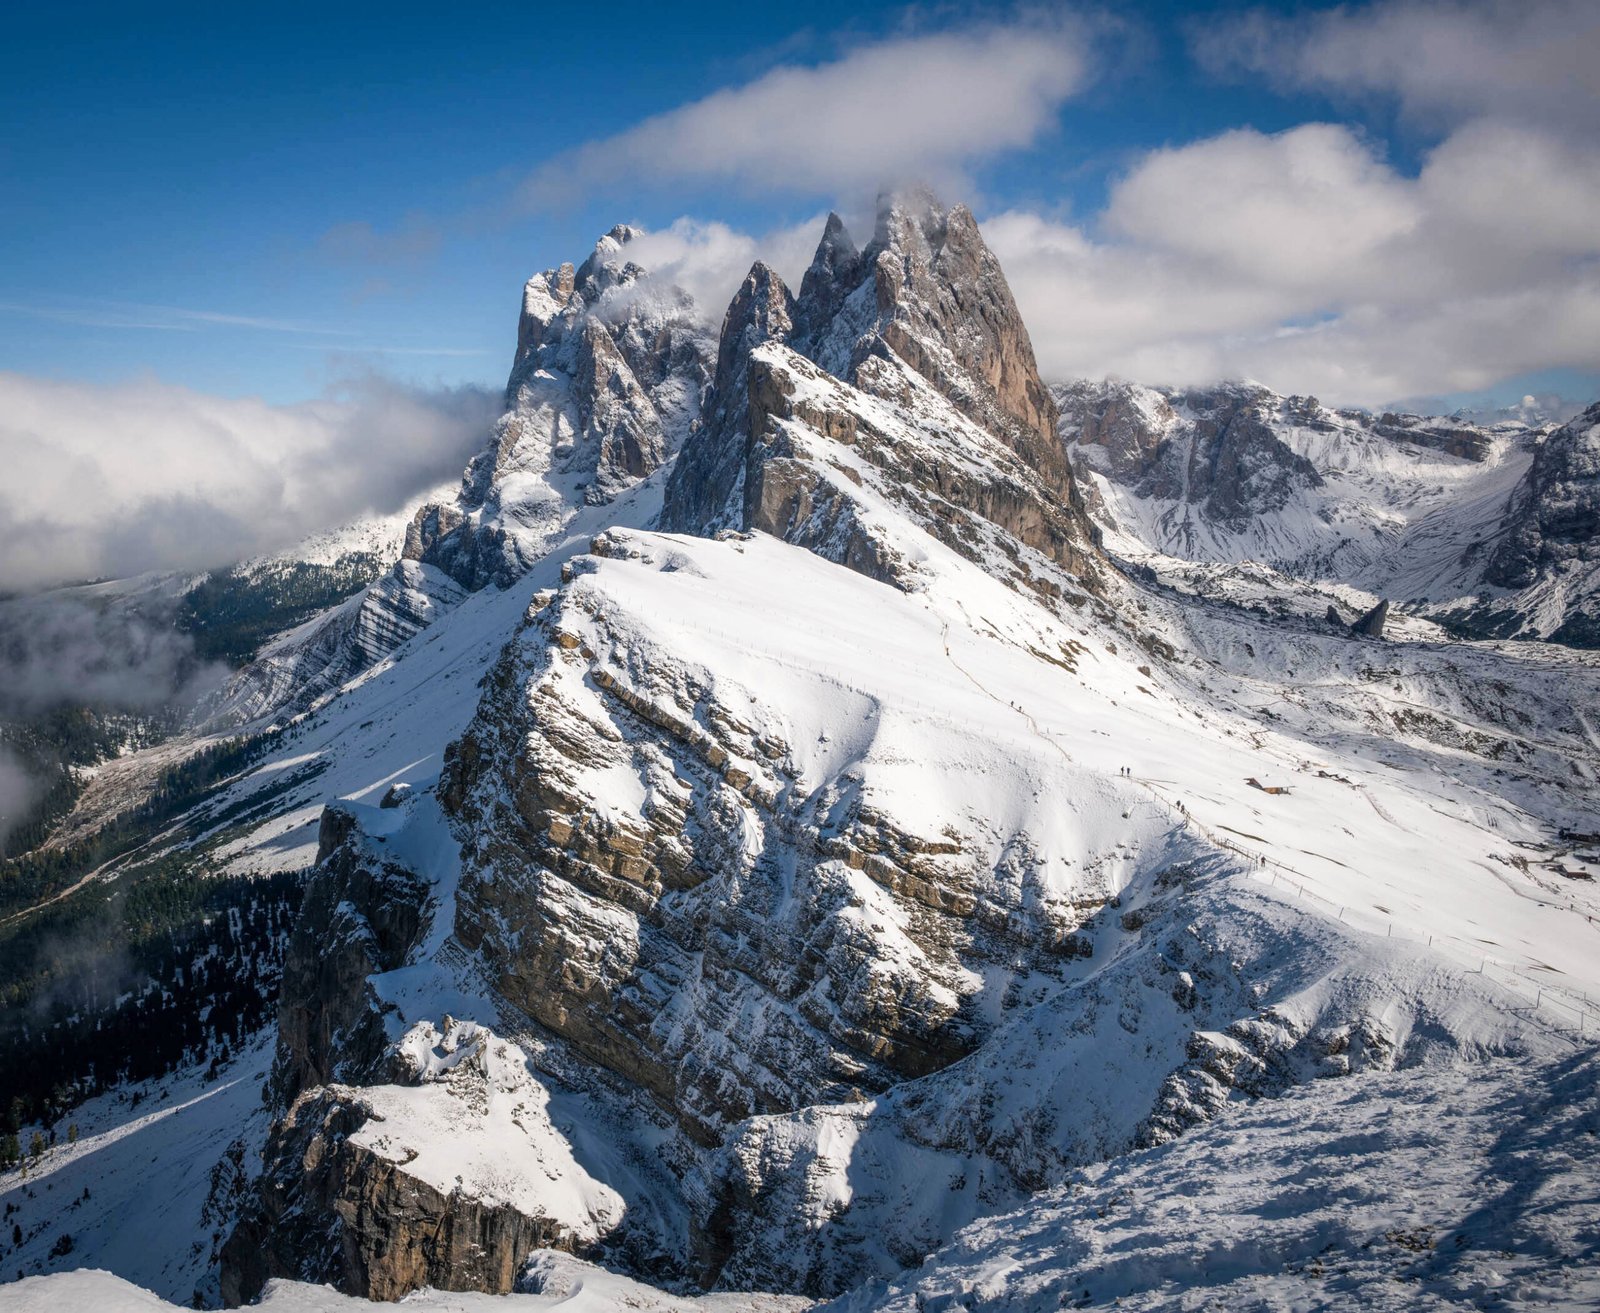
Seceda: The Dramatic Mountain Ridge
Seceda offers one of the most dramatic mountain ridges of the Dolomites, with sharp peaks plunging into green valleys. This is personally one of my favorite locations. Read more in my article about Seceda and Col Raiser: Hiking to the Iconic Viewpoint in the Dolomites.
Light & Timing
Sunrise: The sun rises from behind the Odle peaks, creating beautiful sun rays and silhouettes. You can create interesting sunstars as the sun peeks from behind the peaks.
Sunset: The sun sets behind your back, fully illuminating the mountain ridge. This gives the most “classic” images with golden light on the peaks.
Cloudy weather: Seceda is spectacular with clouds! Low-hanging clouds drifting around the peaks create dramatic, mysterious images. Go even in less favorable weather!
The Cable Car Challenge
The cable car from Ortisei doesn’t open until 9:00 and closes at 17:30 – too late for sunrise, too early for sunset in summer. Your options:
- Overnight stay: Rifugio at the top or tent (tolerated). This is the ideal option for serious photographers.
- Hiking in the dark: Start 3-4 hours before sunrise from Ortisei or Santa Cristina. Not for everyone, but the reward is great.
- Cable car + descent: Take the last cable car up, photograph sunset, and hike back in the dark (headlamp mandatory!).
- Alternative: Col Raiser lift from Santa Cristina, then 1 hour walk to Seceda. Hotel Col Raiser offers overnight accommodation close to the top.
Equipment
- Telephoto lens (100-400mm): Compresses the mountain layers and emphasizes the jagged shapes of the Odle group. This is THE lens for Seceda.
- Wide-angle: For the 360° panorama encompassing all surrounding peaks: Puez, Sella, Sassolungo, and more.
- GND filter: Useful at sunrise with sunstar to control the contrast.
Alpe di Siusi: The Endless Alpine Meadow
Alpe di Siusi, Europe’s largest alpine meadow, is known for its rolling hills, wooden huts, and surrounding mountain peaks. It’s a place where you can easily spend an entire day.
Read Seiser Alm: Hiking Routes, Photography Tips and Practical Info for a complete guide to this beautiful area.

Light & Timing
Sunrise: The sun rays enter the valley and create beautiful light beams through the morning mist. Increase your aperture to f/14-17 to capture the rays sharply. The location near Adler Lodge Hotel is iconic for this.
Sunset: Warm light on the Sassolungo and the vast green fields. Personally my preference because of the soft, golden light falling over the meadow and huts.
Summer vs. Autumn: Summer gives nice side light and green fields with wildflowers. Autumn offers colored larches and the possibility for sunstars due to the lower sun position.
Composition & Technique
- Foreground: Wooden huts, fences, and grasses form perfect foreground elements with Sassolungo in the background.
- Panorama: The vast landscape lends itself excellently for panoramic photos. Use a nodal rail for perfect stitching.
- GND filter: Almost always useful here due to the large brightness contrast between sky and meadow.
Pro tip: There are countless compositions possible in this vast area. Pick one and wait for the light instead of wandering around looking for something better. The best photos are created through patience, not by covering kilometers.
Also try making a panorama. This area is extremely well suited for this technique where you combine different portrait shots into one wide whole. A tripod is essential for this. Level the tripod completely first, then the camera.
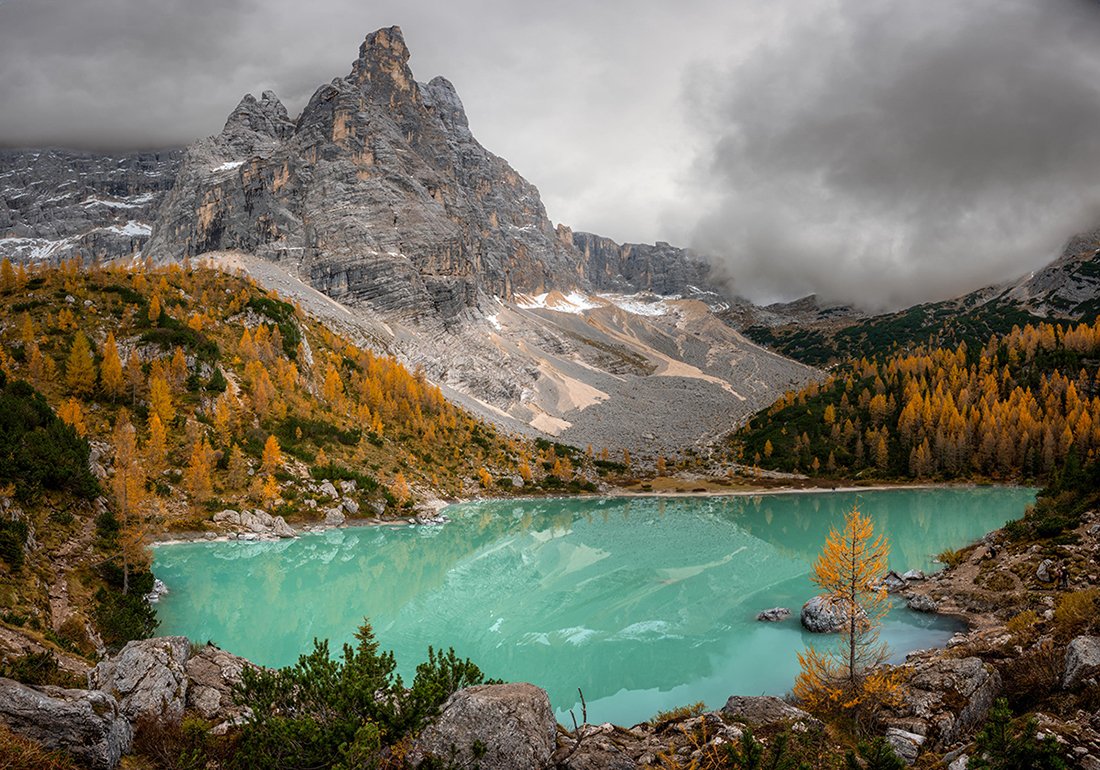
Lago di Sorapis: The Turquoise Jewel
Lago di Sorapis is a turquoise jewel, hidden in the heart of the Dolomites. The unreal color comes from “glacial flour” – finely ground rock powder from glaciers. This makes the lake uniquely photogenic, but also challenging to capture well.
Light & Timing
Mid-morning (9:00-11:00): Counter-intuitive, but this is the best moment. The sun needs to be high enough for the turquoise color to fully come into its own, but not so high that harsh shadows appear.
Avoid: Early morning (too dark for the color) and midday sun (too harsh light). Cloudy days are also less ideal – the color shows best in direct sunlight.
Crowds: The trail is extremely popular. Start as early as possible (before 7:00) to avoid crowds on the trail and photograph at the lake in peace.
Equipment & Technique
- Polarizing filter (essential!): Reduces reflections on the water surface and enormously enhances the turquoise color. Experiment with the angle – sometimes you want to retain some reflection.
- ND filter: Less necessary than at other lakes – the special color actually shows best at shorter shutter speeds. Long exposures can “wash out” the color.
- Lenses: Wide-angle for the surrounding mountains (Punta Sorapis, “Finger of God”). Telephoto for details of rock formations and color variations in the water.
- Walk around the lake: Take time to explore the entire lake. The west side offers different perspectives and is quieter.
Note: The hike to Lago di Sorapis (±2 hours) has some challenging sections with cables. Sturdy hiking boots are essential. Not suitable for people with severe fear of heights. Be especially careful in wet weather, the ground becomes slippery in places.
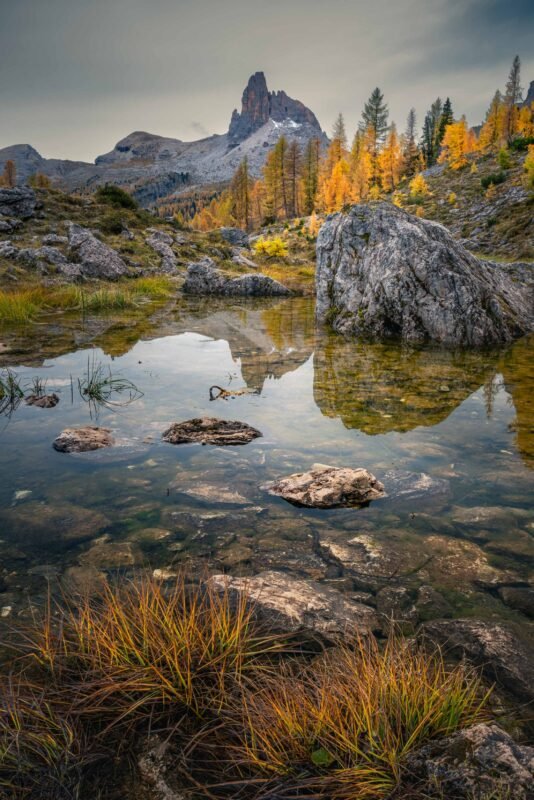
Lago Fedèra: Autumn Colors and Mist
Lago Fedèra is a serene alpine lake, surrounded by larch forests that take on a magnificent golden color in autumn. This place offers a peaceful atmosphere that is perfect for atmospheric and reflective photos.
For a complete guide with hiking routes, read Hiking to Lago Federa: Complete Guide for the Dolomites.

Light & Timing
Sunrise in autumn: THIS is the moment. The golden larches, morning mist above the water, and the first light on Becco di Mezzodì – it’s pure magic. Start your hike in the dark (±1.5 hours from Ponte de Ru Curto).
Late afternoon: Also beautiful when the larches light up in warm tones. You can walk back in daylight then.
Best period: Second half of October, when the larches are at their most beautiful. Check beforehand if there hasn’t been early snowfall.
Equipment & Composition
- Wide-angle: For reflections of the surrounding peaks and trees in the lake. Look for a low angle with aquatic plants in the foreground.
- Telephoto: The Cinque Torri are visible in the distance – compress them with a 200-400mm lens.
- ND filter (6 stops): Perfect for misty mornings. A shutter speed of 1-4 seconds gives the mist an ethereal quality without losing the reflections.
- Best side: The west side of the lake offers the most beautiful compositions with Mount Becco di Mezzodì. The mountain hut Rifugio Palmieri also forms a nice element.
Overnight stay: Rifugio Croda da Lago/Palmieri is located right at the lake and is open until early November. Ideal for photographing sunrise without having to hike in the dark. Book in advance!
Also look for compositions with an interesting foreground. There are plenty to be found at this location.

Practical Information for Photographers
Recommended Equipment
| Lenses | Wide-angle (16-35mm) + telephoto (70-200mm or longer). Consider a 24-70mm as an all-round option. |
| Filters | Polarizing filter (essential for lakes), GND 0.6-0.9 (for high contrast), ND 6-10 stops (for long exposures) |
| Tripod | Sturdy travel tripod. It can get quite windy in the mountains – quality counts. |
| Headlamp | Essential for early starts and late returns. Red light to preserve night vision. |
| Clothing | Layers! Even in summer it can be 5-10°C in the morning at 2,000m+. Always bring a wind jacket. |
| Batteries | Cold mornings drain batteries. Bring spares and keep them warm in your jacket pocket. |
Filter Usage per Location
| Location | Polarizing Filter | ND Filter | GND Filter |
| Tre Cime di Lavaredo | Useful for sky | Rarely needed | At sunrise/sunset |
| Lago di Braies | Essential | 6-10 stops for smooth water | Sometimes useful |
| Val di Funes | Moderately useful | Rarely needed | At sunset |
| Seceda | Useful for sky | Rarely needed | With sunstars |
| Alpe di Siusi | Moderately useful | Rarely needed | Often useful |
| Lago di Sorapis | Essential! | Not recommended (bleaches color) | Sometimes useful |
| Lago Fedèra | Useful | 6 stops for mist effect | At sunrise |
Cost Overview (2025 prices)
| Location | Access/Parking | Notes |
| Tre Cime di Lavaredo | €40 toll road (car) | Online reservation required via pass.auronzo.info |
| Lago di Braies | €40 (July 10 – Sept 10) | Includes €20 voucher. Reservation via pragsparking.com |
| Seceda cable car | €35-52 return | Parking Ortisei: €2.50/hour |
| Alpe di Siusi | €30/day (Compatsch) | Road closed 9:00-17:00 |
| Lago di Sorapis | Free | Parking along SR48 at Passo Tre Croci |
| Lago Fedèra | Free | Parking at Ponte de Ru Curto |
| Val di Funes | Free | Parking in Santa Maddalena |
Frequently Asked Questions
What is the best time of year for photography in the Dolomites?
June-September is ideal for mountain photography with all facilities open and wildflowers. October is spectacular due to the golden larches – perfect for Lago Fedèra and Val di Funes. Avoid July-August if you want to escape crowds. Winter offers snowy landscapes but limited accessibility.
What filters are essential for the Dolomites?
A polarizing filter is indispensable for lakes (especially Lago di Sorapis and Lago di Braies). A GND filter (0.6 or 0.9) helps at sunrise/sunset. An ND filter (6-10 stops) is useful for long exposures at lakes with light rippling, but not always necessary.
How do I avoid crowds at popular locations?
Sunrise is your friend – most tourists don’t arrive until after 9:00-10:00. At Lago di Braies this means being present before 7:00. At Tre Cime you can stay overnight in a rifugio for peace during golden and blue hour. Weekdays are always quieter than weekends.
Can I photograph sunrise at Seceda using the cable car?
No, the cable car doesn’t open until 9:00. Options are: staying overnight in a rifugio or tent on the mountain, hiking in the dark (3-4 hours), or combining the Col Raiser lift with an overnight stay at Almhotel Col Raiser. Alternative: photograph sunset and walk back in the dark.
What lens is most important for mountain photography?
A wide-angle (16-35mm) for landscapes and a telephoto (70-200mm or longer) for details and compression. If you can only bring one lens, a 24-70mm is versatile. For Seceda and Val di Funes, a telephoto is almost mandatory for the iconic shots.
Is an ND filter needed for lakes in the Dolomites?
At Lago di Braies and Lago Fedèra, a 6-10 stop ND filter can help smooth out light rippling (2-8 seconds). At Lago di Sorapis it’s not recommended – the special turquoise color shows better at normal shutter speeds. A polarizing filter is more important than an ND filter.
Further Reading
Related Spothunter Articles
- Hiking to Lago Federa: Complete Guide for the Dolomites
- Lago di Braies: Photography at the Pearl of the Dolomites
- Val di Funes: Hiking and Photography in the Most Beautiful Valley
- Seceda and Col Raiser: Hiking to the Iconic Viewpoint
- Seiser Alm: Hiking Routes, Photography Tips and Practical Info
Useful External Links
- Südtirol / Alto Adige Tourism – Official tourist information
- Tre Cime Reservation – Toll road reservation
- Lago di Braies Parking – Parking reservation
- Seceda Cable Car – Tickets and opening hours
- Alpe di Siusi – Official website
Final Thoughts
The Dolomites are a paradise for photographers, with an unparalleled variety of landscapes and natural beauty. Plan your visits around the best light and bring essential gear like a sturdy tripod, polarizing filter, and multiple lenses. And just as important: good clothing, sturdy shoes, and sufficient water and food!
Enjoy your photography!
Are you interested in the Dolomites or want to see more of my photography in this area? Check out my books here! Looking for beautiful wall decoration? Take a look at my fine art prints.